
Getting started
Termo is a terminal for Windows, macOS and Linux. It opens your usual consoles (PowerShell, bash, zsh…) in tabs and split panes, and it is built for working with AI agents such as Claude Code, Codex, Gemini CLI, Copilot CLI and Grok.
This page takes you from the download to having your first console open and knowing where everything is.
Install Termo
- Go to the home page and click Download Termo. The button picks the installer for your system.
- If you need a different one, open the arrow next to the button and choose it from the list.
- Run the installer and open Termo.
| System | Installers |
|---|---|
| Windows (x64) | .exe installer or .msi |
| macOS | .dmg for Apple Silicon or for Intel |
| Linux (x64) | .AppImage, .deb (Debian / Ubuntu) or .rpm (Fedora / RHEL) |
Every published version is at github.com/nicoriff/termo-releases.
New versions are installed from inside the app: see Updates.
Opening Termo on macOS for the first time
Termo is not notarized by Apple yet, so the first time you open it macOS says it can't verify the developer. To open it anyway:
- Drag Termo to Applications and open it. Close the warning.
- Open System Settings → Privacy & Security, scroll down to the message about Termo and click Open Anyway.
- Confirm with your password. From then on Termo opens normally.
If macOS says Termo "is damaged and can't be opened" (versions up to 0.25.1 on Apple Silicon), run this in Terminal and open it again:
xattr -dr com.apple.quarantine /Applications/Termo.app
The initial setup
The first time you open Termo you get Initial setup, a wizard with six short steps. What you choose applies right away, and you can change it later in Preferences.
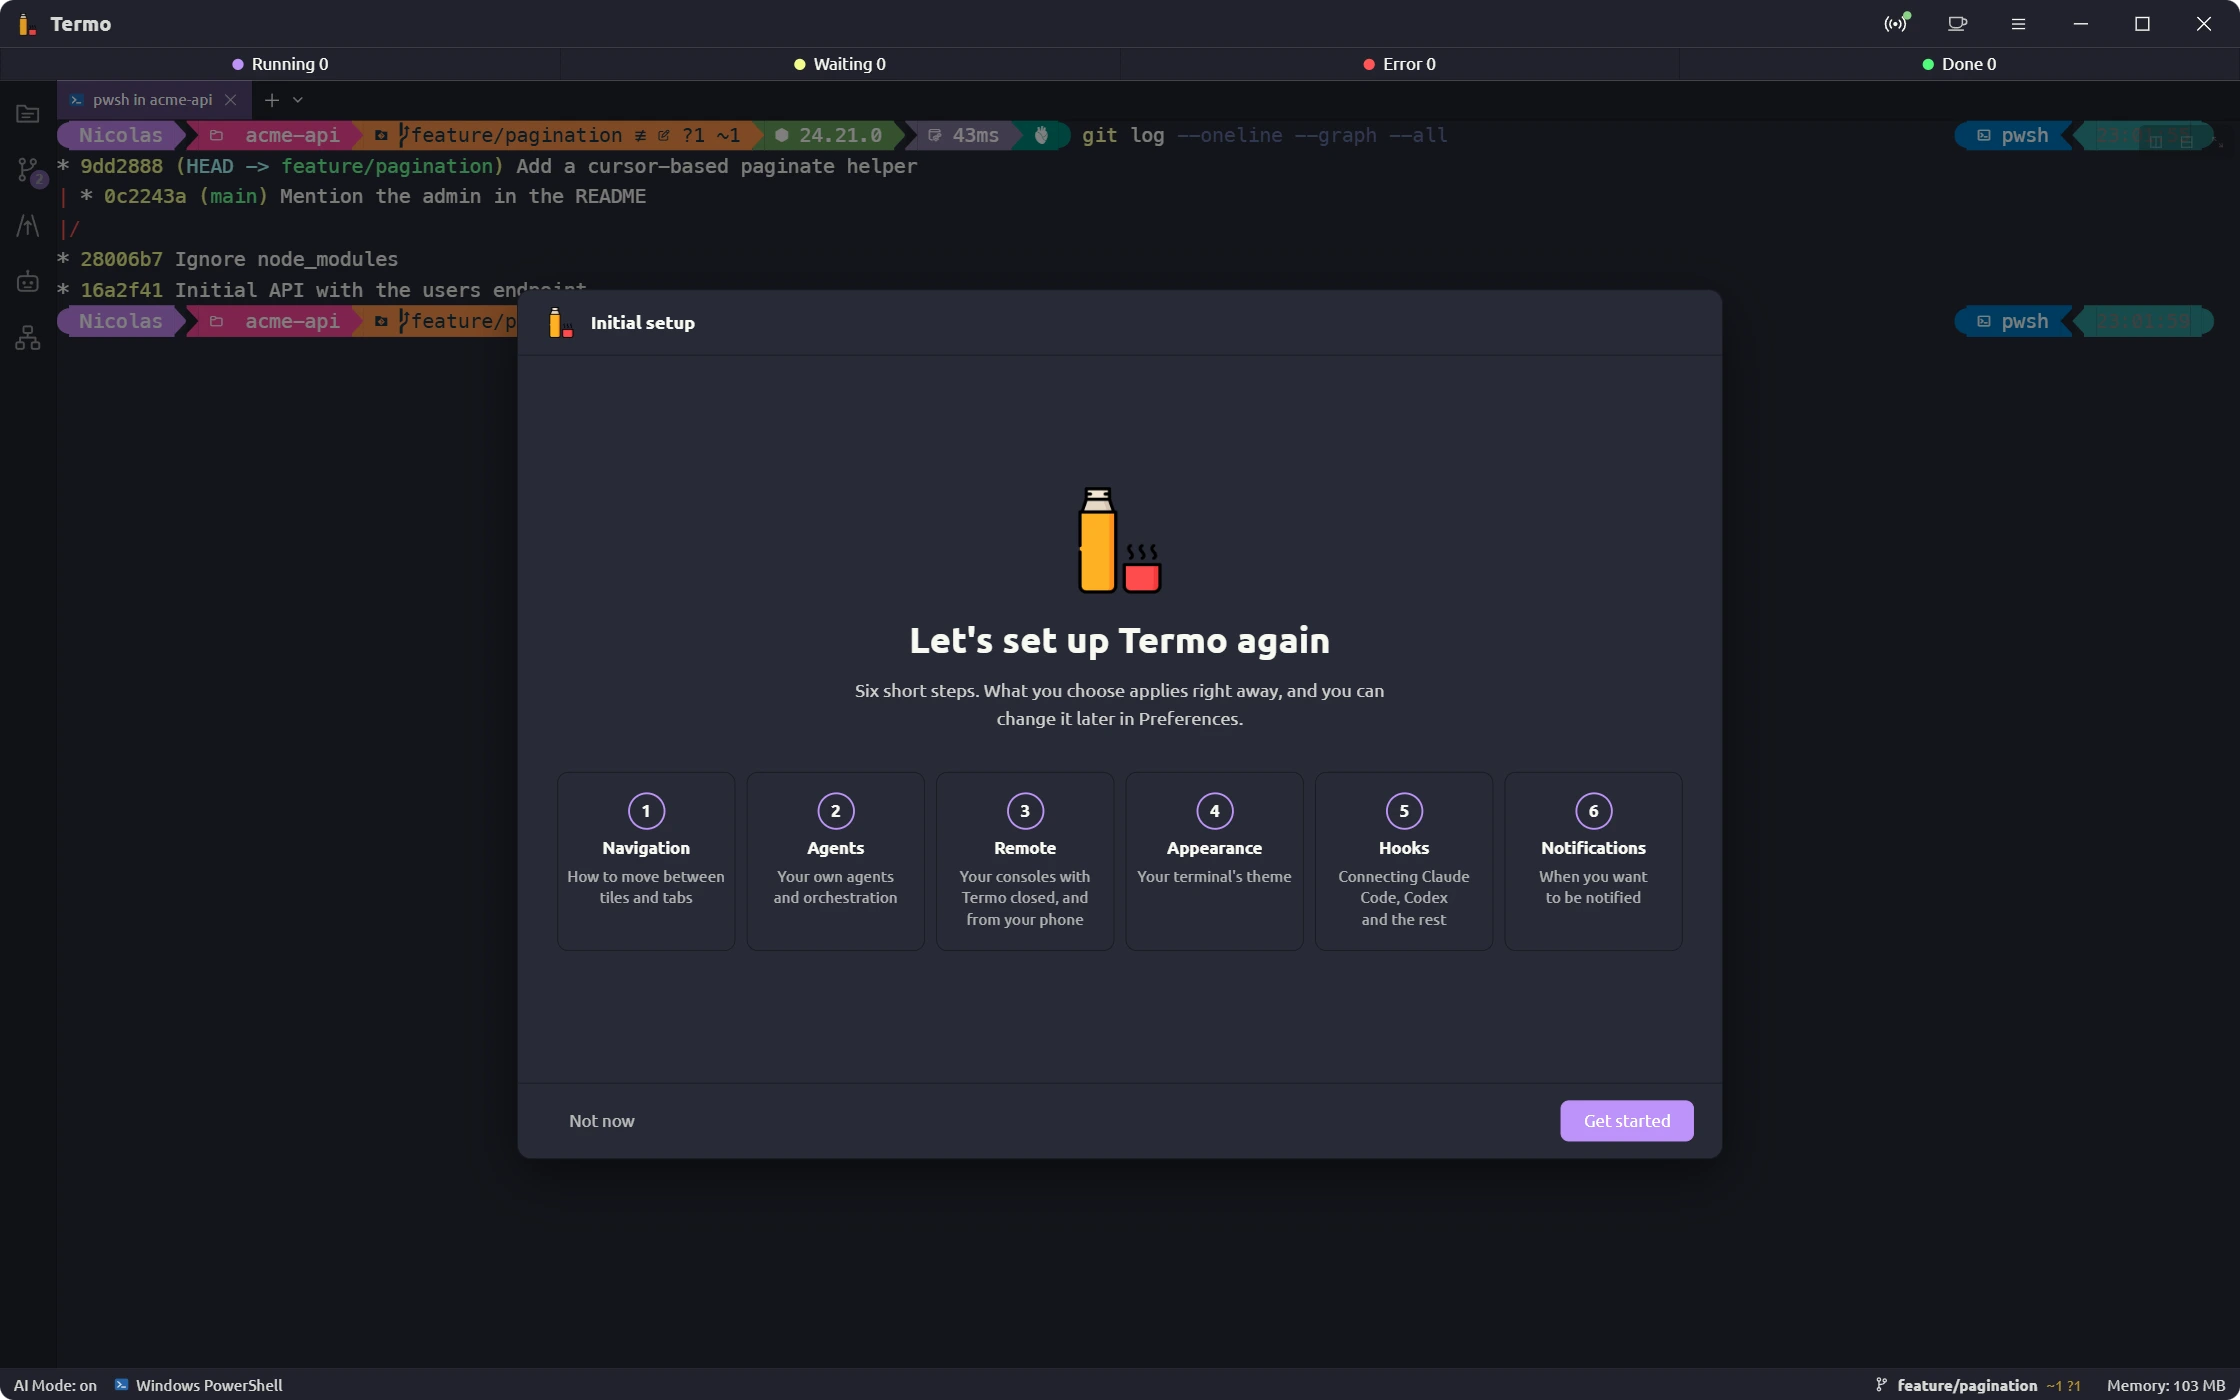
| Step | What you do |
|---|---|
| Navigation | See how to move between tiles and tabs with the keyboard. |
| Agents | Meet local agents and orchestration. |
| Remote | See how consoles keep running with Termo closed and how to use them from your phone over Tailscale. |
| Appearance | Choose the terminal's theme. |
| Hooks | Connect Claude Code, Codex and the other agents so they tell Termo what they are doing. |
| Notifications | Choose when you want Termo to notify you. |
You can leave the wizard at any point with Not now. To run the wizard again later, open the ≡ menu → About Termo → Getting started.
Get to know the window
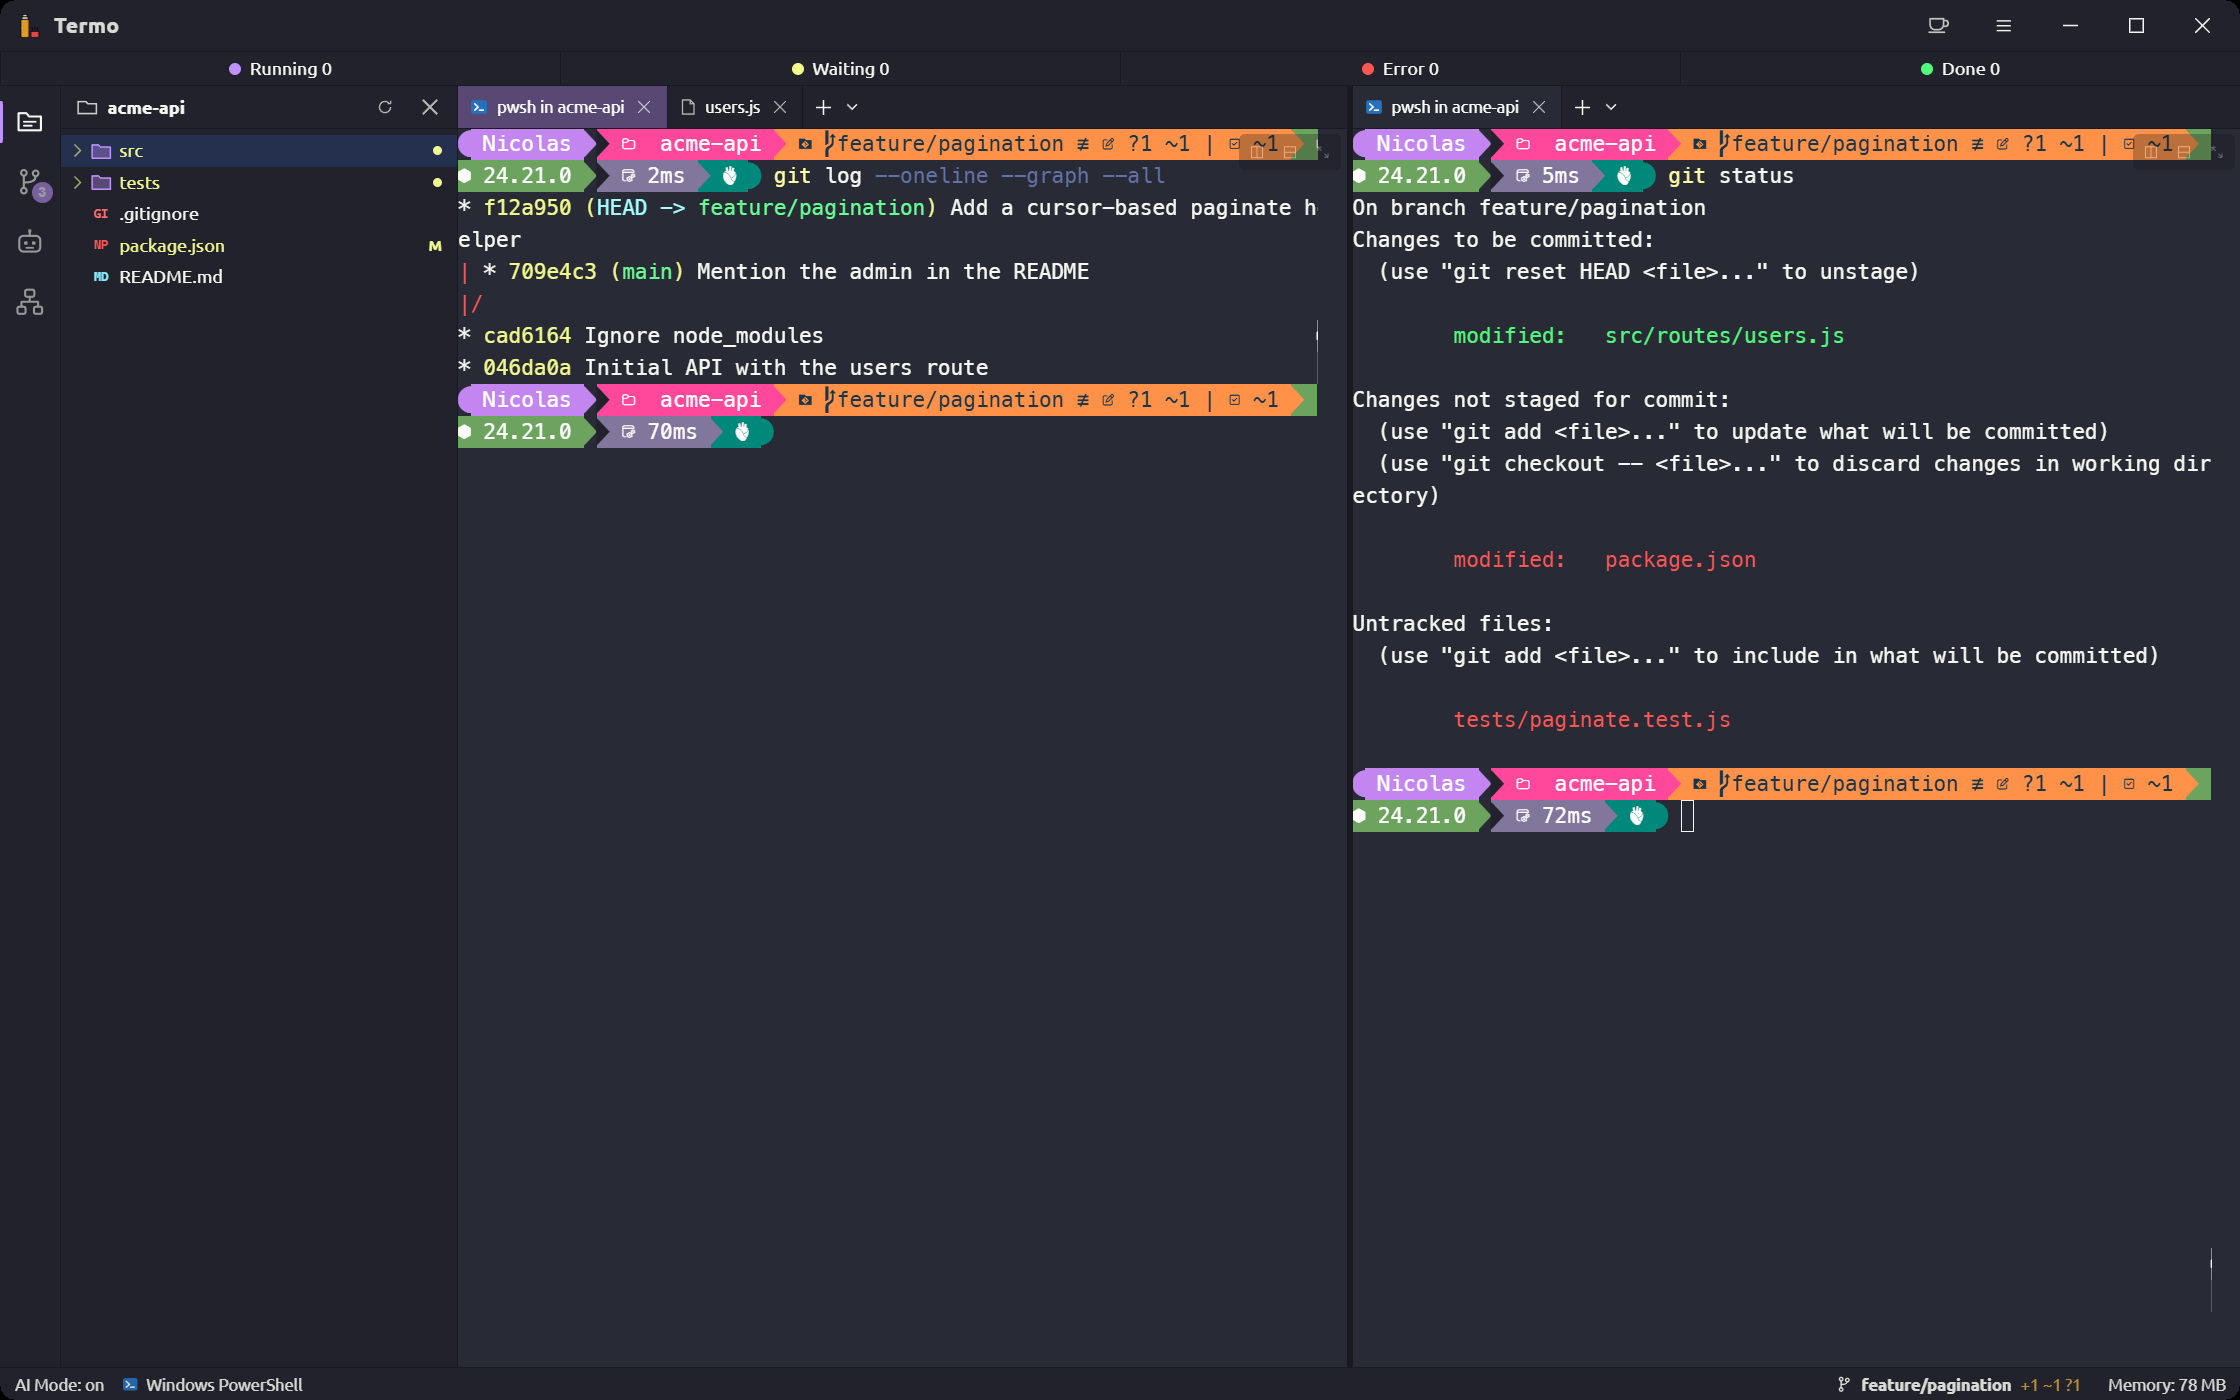
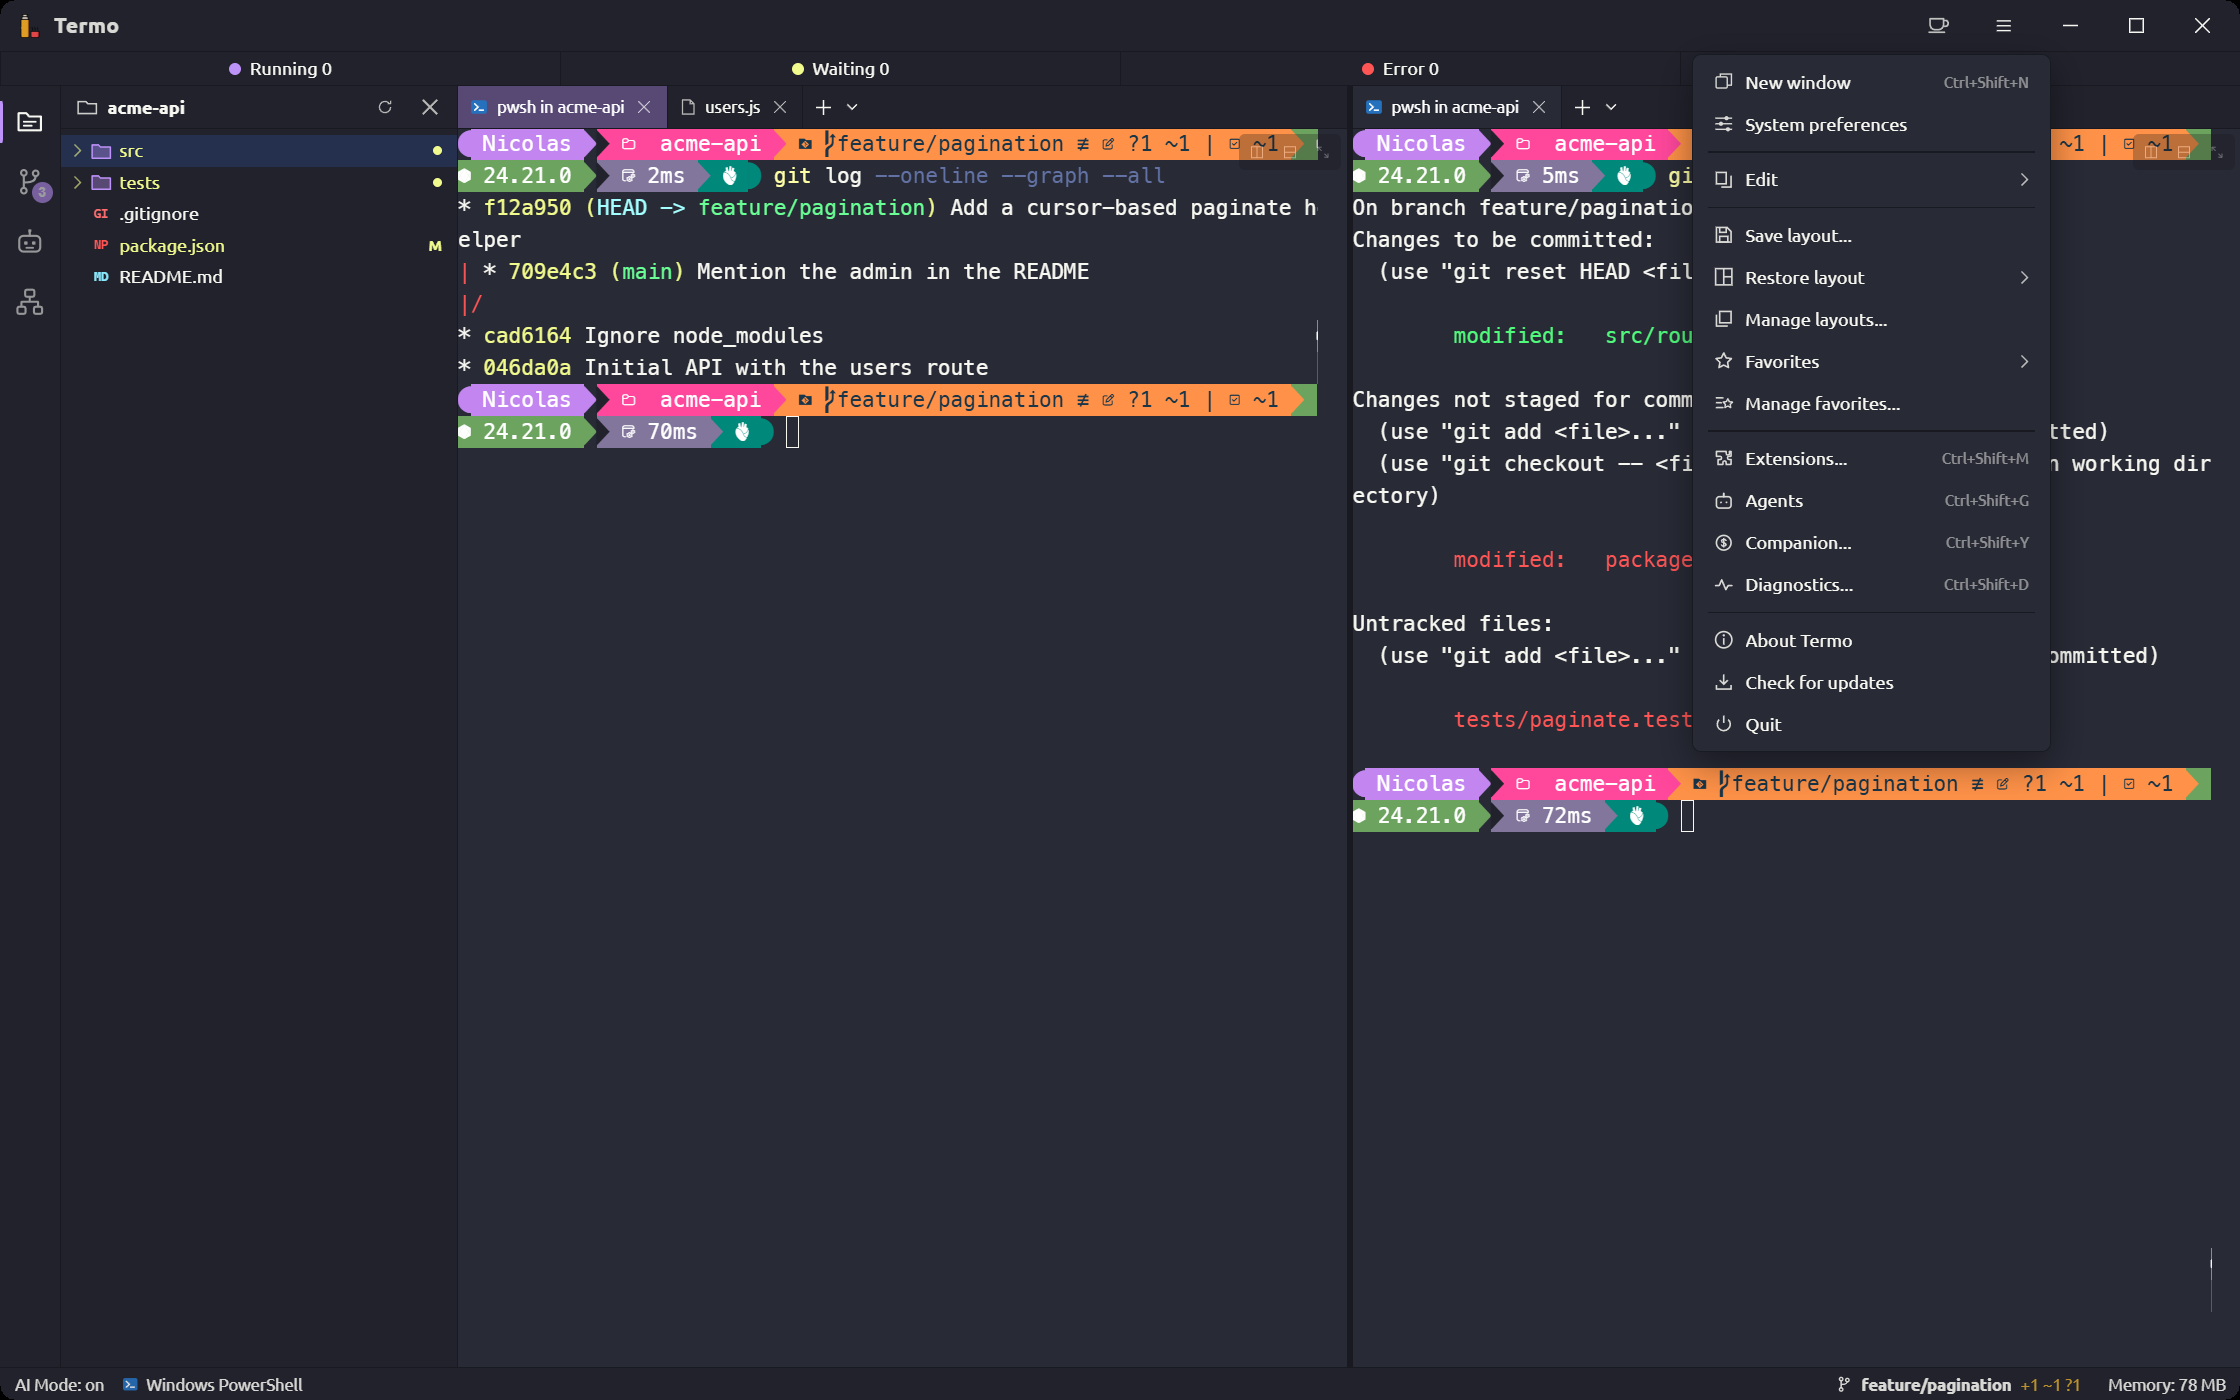
- Title bar. It holds the ≡ menu, with almost everything that is not a console: new window, preferences, layouts, favorites, extensions, AI Companion, diagnostics and updates. Next to it are the antenna, for remote access, and the cup, which keeps the computer awake.
- AI Mode bar. It counts the tabs with an agent in each state: Running, Waiting, Error and Done. Click a state to see those tabs and jump to one. It only shows with AI Mode on (it is on by default).
- Panels bar. The buttons on the left edge open the side panel's sections: File explorer, Git, Agent Harness, Tab groups, Kanban boards, Local agents and Orchestration agents. See Side panel.
- Tiles. The window splits into tiles and each tile has its own tabs. Each tab runs a console, an agent or an open file.
- Status bar. It shows data about the active tab: the git repository, the console type or the agent detected, plan usage, context and memory. What it shows is up to you: see Status bar.
Side panel
The side panel can show several sections at once:
- A click on a button of the panels bar adds its section to the topmost group, below the others, as an accordion. If the section is already in the panel, it unfolds where it is. Clicking the button of the section that's showing hides the panel, which keeps what it had for next time.
- Each section's header shows its icon, its name, its own buttons and an × to close it. Click the header to fold or unfold the section.
- Drag a button or a header to the top or the bottom of a group to open the section in a group of its own, shown at the same time. Drop it in the middle of a group to add it to that group instead. Drag the line between two groups to share the height; double-click it to even them out.
Termo remembers the sections, their order and the size of the panel the next time it starts.
The ≡ menu is where most of the app's features start:
Open your first console
Termo starts with one console open, your system's default. To open more:
- Click + on a tile's tab bar, or press
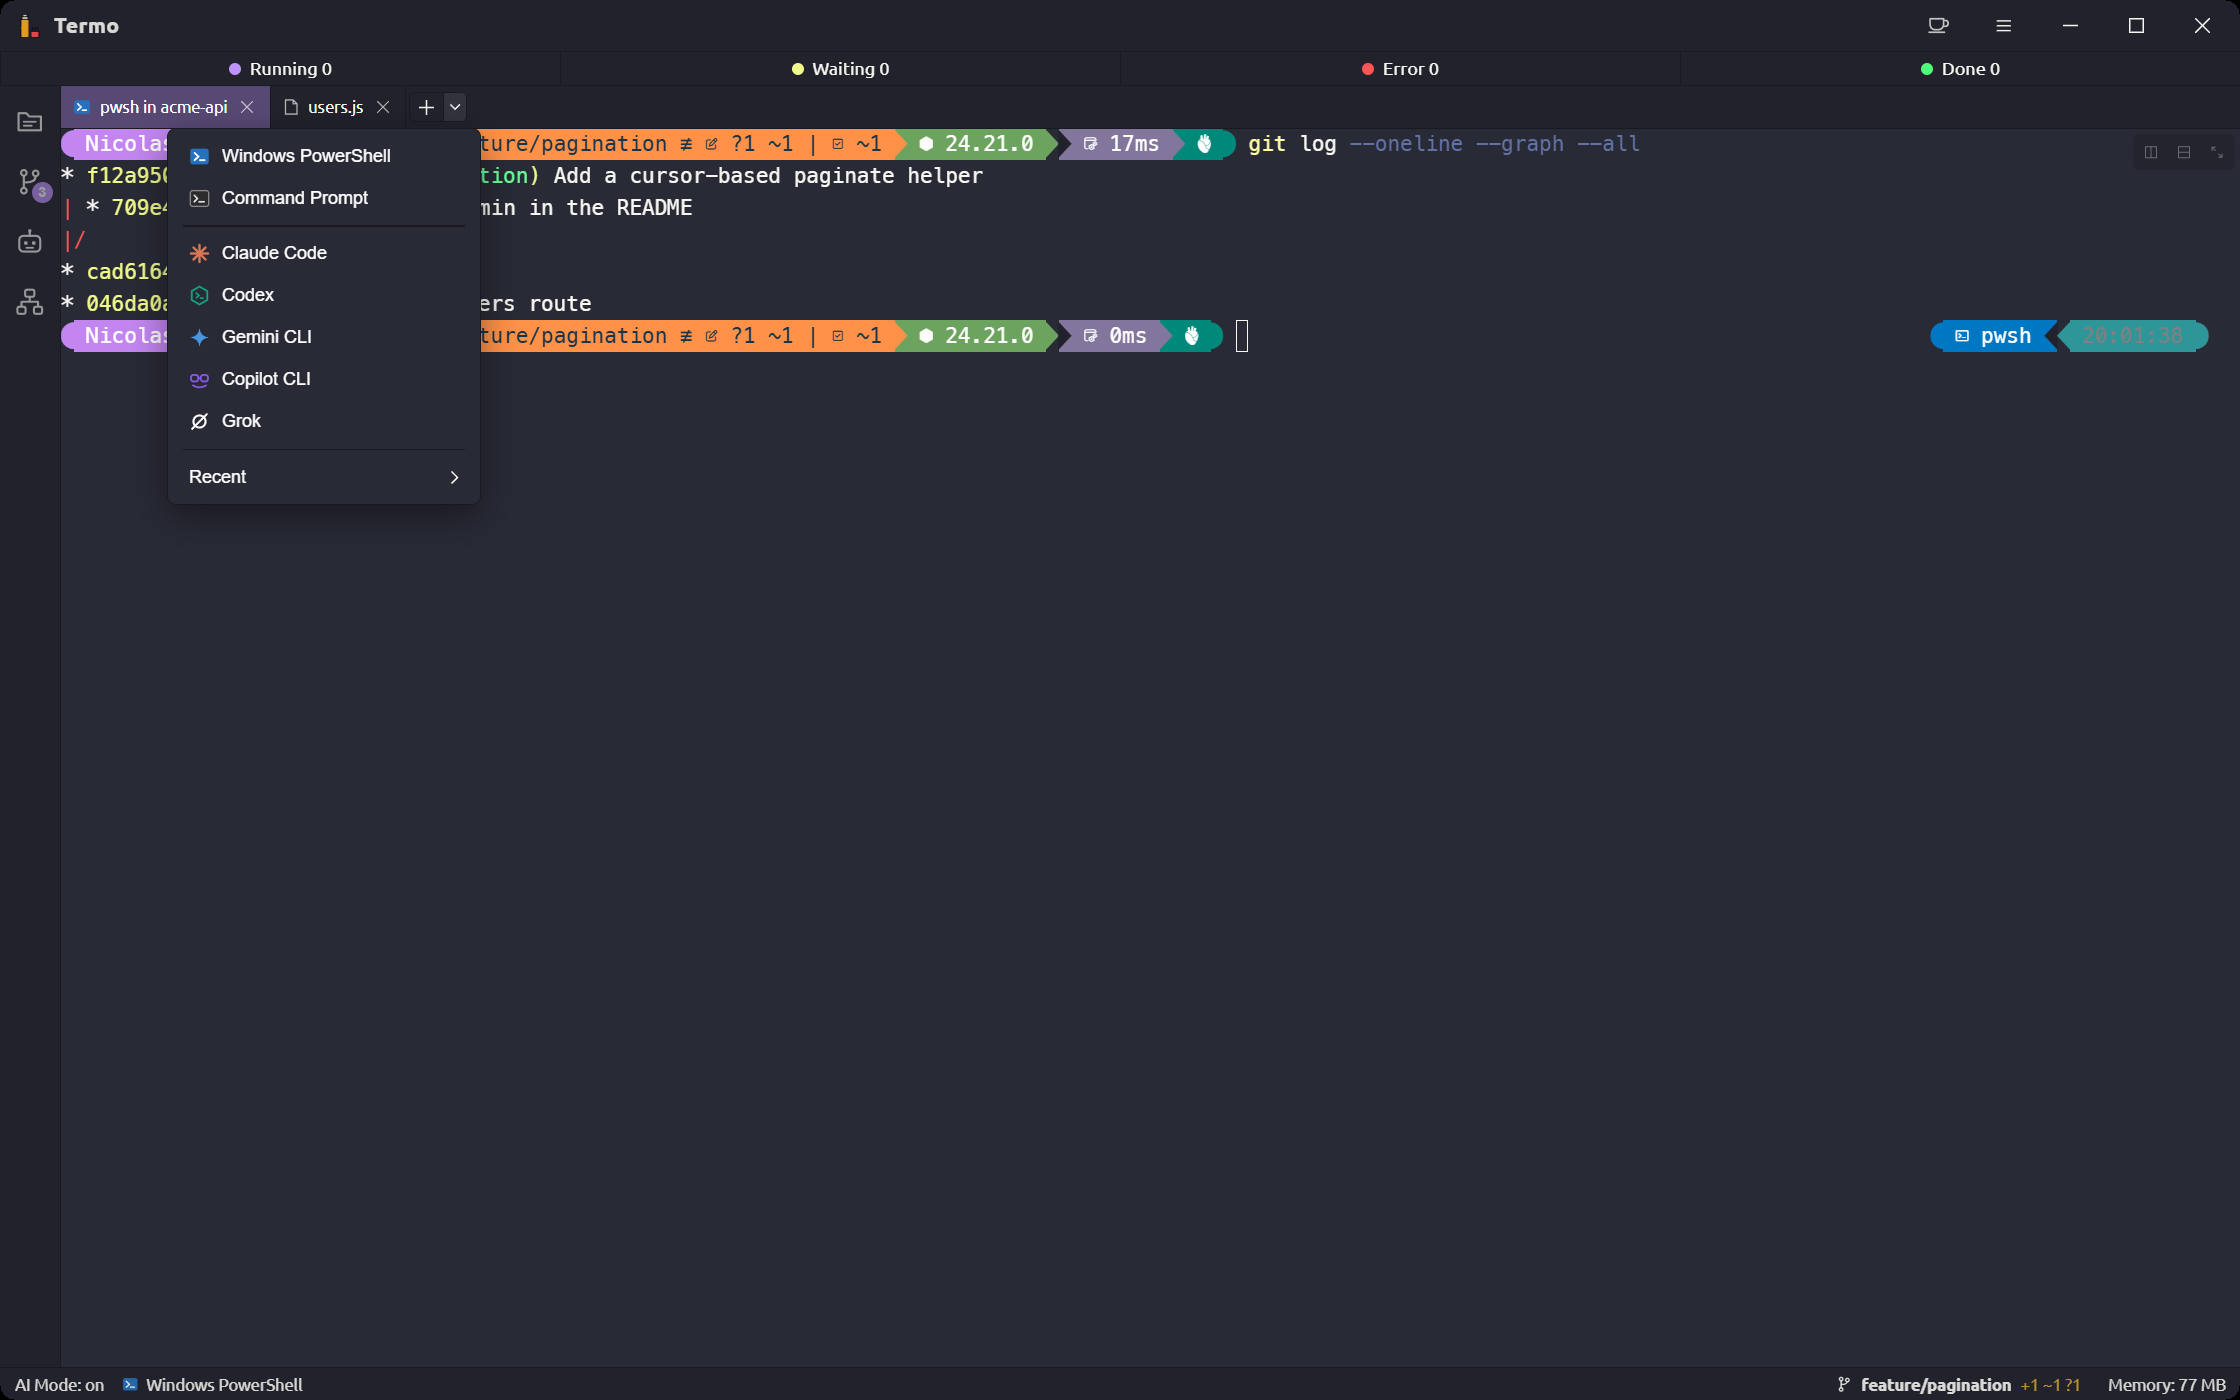
Ctrl+T(⌘Ton macOS). Another tab opens with the default console. - To pick a different one, click the ˅ arrow next to the +. The list shows the installed consoles and, below them, the agents: Claude Code, Codex, Gemini CLI, Copilot CLI and Grok.
- To open it in another folder, click the folder icon on that row, or
Shift+clickthe console.
The console that + opens is set in Preferences → Console → Default console.
Split the window
Rest the mouse on a tab's title and the buttons that split its tile open out next to it:
- Split vertically puts the new tile beside it.
- Split horizontally puts it below.
- Zoom tab makes the tile take the whole window; the same button (Restore tab) puts it back.
You can also drag a tab to another tile, or drop it on an edge to create a new group.
All of this works from the keyboard too: see Tabs, tiles and layouts.
The command palette
Press Ctrl+Shift+P (⌘⇧P on macOS) and type what you want to do: split a tile, change the theme, open an agent, restore a layout. Enter runs it.
It is the fastest way to find a feature without knowing where it lives. More in Command palette and shortcuts.
Preferences
Open the ≡ menu → System preferences, or type "Go to Preferences" in the palette. They open in a separate window, organized by section: General, Appearance, Font, Console, AI Mode, Git, Shortcuts and more.
The app's language is set in Preferences → General → Language: System, Español or English.
Shortcuts to start with
| Action | Windows and Linux | macOS |
|---|---|---|
| New tab | Ctrl+T |
⌘T |
Cycle tabs (with Shift, backwards) |
Ctrl+Tab |
⌃Tab |
| Zoom the tile | Alt+↑ |
⌘↑ |
| Restore the tile, or open the tile picker | Alt+↓ |
⌘↓ |
| Command palette | Ctrl+Shift+P |
⌘⇧P |
| New window | Ctrl+Shift+N |
⌘N |
| Copy | Ctrl+Shift+C |
⌘C |
| Paste | Ctrl+Shift+V |
⌘V |
On Windows, Ctrl+C also copies when text is selected, and Ctrl+V also pastes.
Every shortcut can be changed in Preferences → Shortcuts.
What's next
- Tabs, tiles and layouts: arrange the window and save how you left it.
- AI Mode: work with Claude Code, Codex and the other agents.
- Local agents: create agents that do tasks on their own.